The number one feature request I get when I setup a new CallManager system is for direct voice mail transfers. But you might say, “That’s easy. Just put the iDivert softkey on the softkey template.” Oh ho, not so fast. This request is for people to transfer a caller directly to someone else’s voice mail. It seems that I either deal with some very polite customers that don’t want to interrupt the other person with a phone call or don’t want to the caller to wait the four or so rings before voicemail picks up. Either that, or direct voice mail transfers are great ways to get rid of pushy salespeople.
At any rate, this is a feature that should probably have been baked into CallManager by now but hasn’t been for some reason. Don’t ask me why. But should you ever find the need to set it up for yourself, here’s how you do it:
1. Figure out a transfer pattern. It goes without saying that you should figure out what pattern you are going to use to allow calls to do direct voice mail transfer. Some people are huge fans of using the pound/hash/octothorpe key. Since I hate explaining exactly what an “octothorpe” is to people, I tend to favor the star/asterisk key. Mainly because I like saying “asterisk” You could also use a combination of the octothorpe and asterisk and one or more numbers. The important thing is that you need to make sure it doesn’t collide something in your current dial plan.
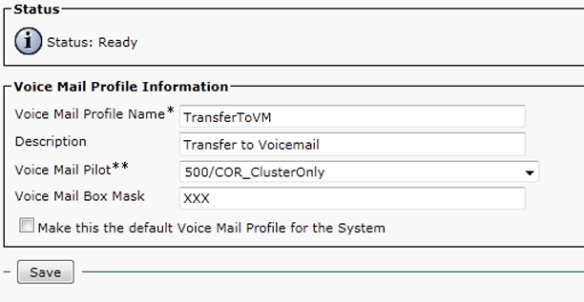
2. Configure the Voice mail Profile. Ah, the meat of things. In order to send a call straight to voice mail, you need a new voice mail profile. Name it something that will make you remember what it does, like “TransferToVM” (my personal favorite). Just don’t put the word ‘voice mail’ in it. Unity seems to like to do really screwy things when the name includes the word ‘voice mail’. Make sure the TransferToVM profile points at your current Voice mail Hunt Pilot. Also, the voice mail mask needs to match your current extension length. In my example below, the extension length is 3 digits, so the voice mail mask is “XXX”.
3. Create a CTI Route Point. CTI route points are like the tunnels of the voice world. They are used to fix a multitude of issues in a pinch. In this case, we need a device that is going to answer the phone rain or shine, and a CTI route point fits the bill. I name mine the same as the voice mail profile just to keep everything straight. Just be sure that it’s in a calling search space that can call your Unity/Unity Connection server. And mind the naming conventions for CTI route points (they’re kind of picky).
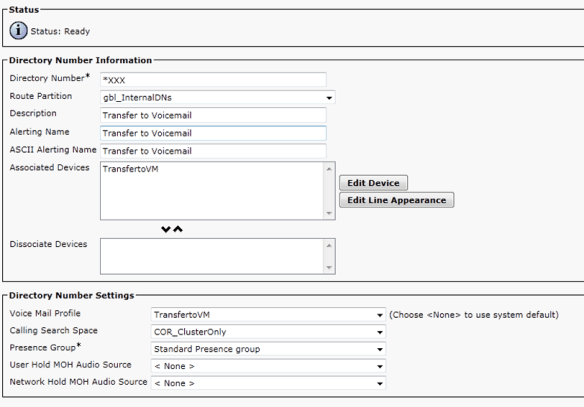
4. Assign a Directory Number. Once you click ‘Save’ on the CTI route point, it’s going to allow you to assign a directory number. This needs to be a combination of your voicemail transfer access code (from step #1) and your voice mail box mask (from step #2). Make sure that it is contained in a partition that is dialable from your internal phones. The important things to note here are that the voice mail profile for the CTI DN needs to be the profile created above (TransferToVM in this case). Also, the Forward All settings need to be checked to send the call directly to voice mail when dialed.
And there you have it. If you followed my example above, whenever you want to send a caller directly to Johnny’s voice mail at extension 101, you just need to dial *101. Works like a charm.


what if, secretary answers the boss’s line then wants to transfer the call to his voice mail (same line as answered) Cisco callmanager 9.x?
it wont work for e.164 numbering plan
Worked liked a champ! Thanks Tom.
Pingback: Writing Is Hard | The Networking Nerd
How to undo the ext. from going straight to VM?
Pingback: Cisco CLACCM end of class links | Subnet Plus